> ## Documentation Index
> Fetch the complete documentation index at: https://docs.trunk.io/llms.txt
> Use this file to discover all available pages before exploring further.
# Test Labels
> Organize and categorize test cases with organization-scoped labels.
Test labels are organization-scoped tags you can apply to individual test cases to organize, filter, and categorize your test suite. Labels can be applied [manually from the test detail page](#apply-and-remove-labels-on-a-test-case) or [automatically by a monitor](#automatic-labeling-from-monitors).

 ## Manage labels
Labels are created, edited, and deleted at **Settings > Organization > Test Labels**. Each label has a name, an optional description, and a color used for its chip in the UI. The settings page also shows how many test cases each label is currently applied to. Any organization member can create, edit, assign, and unassign labels.
Only organization admins can delete labels — the Delete option in each label's menu is disabled for non-admins. Deleting a label removes it from every test case it's applied to; this cannot be undone. A label that is referenced by a monitor's [label action](#automatic-labeling-from-monitors) cannot be deleted — the settings page lists the monitors that still reference it so you can clear those references first.
## Manage labels
Labels are created, edited, and deleted at **Settings > Organization > Test Labels**. Each label has a name, an optional description, and a color used for its chip in the UI. The settings page also shows how many test cases each label is currently applied to. Any organization member can create, edit, assign, and unassign labels.
Only organization admins can delete labels — the Delete option in each label's menu is disabled for non-admins. Deleting a label removes it from every test case it's applied to; this cannot be undone. A label that is referenced by a monitor's [label action](#automatic-labeling-from-monitors) cannot be deleted — the settings page lists the monitors that still reference it so you can clear those references first.
 ## Apply and remove labels on a test case
You apply and remove labels from a test case using the label picker on the test case detail page. The picker lets you search existing labels, toggle them on or off, and create a new label inline if one doesn't already exist. Each assignment records who applied the label and when.
## Apply and remove labels on a test case
You apply and remove labels from a test case using the label picker on the test case detail page. The picker lets you search existing labels, toggle them on or off, and create a new label inline if one doesn't already exist. Each assignment records who applied the label and when.
 ## Filter tests by label
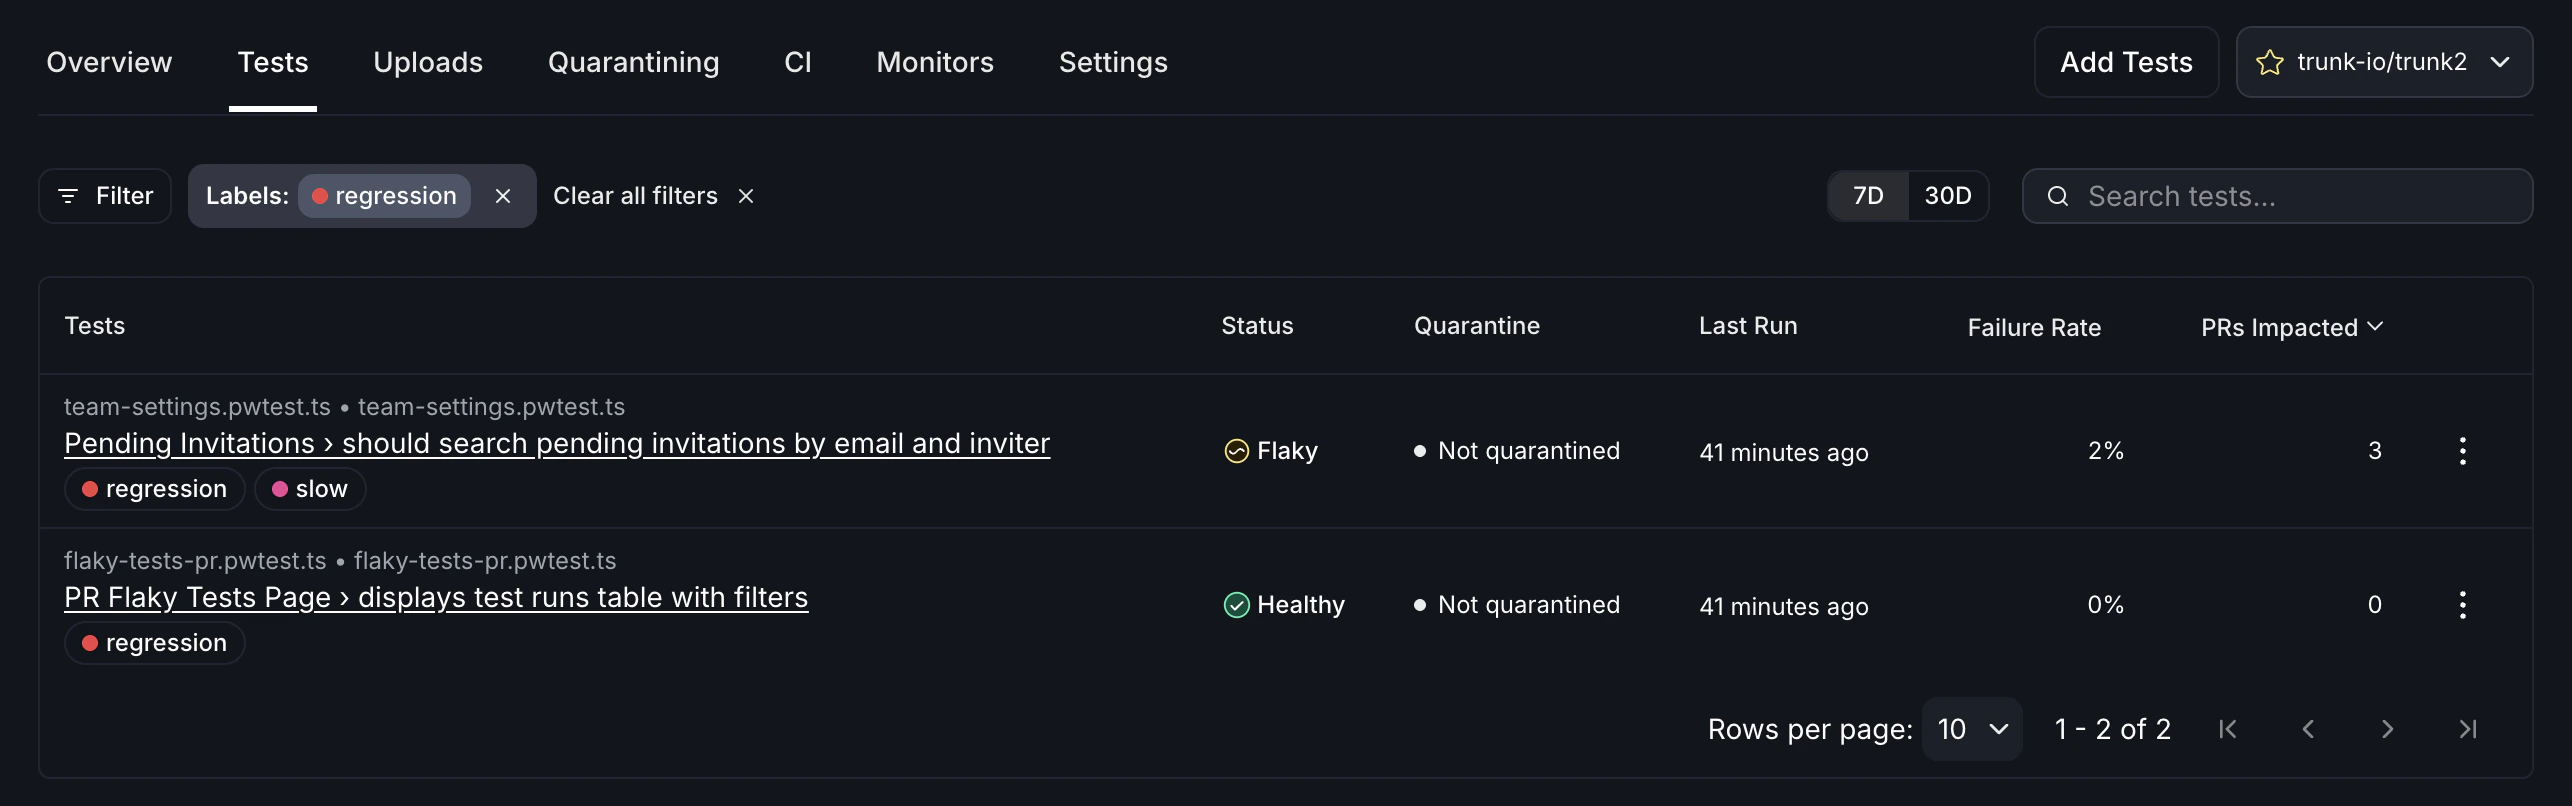
On the tests list, you can filter the table down to test cases that have a particular label applied. This makes labels useful for slicing the view by the categories your team cares about.
## Filter tests by label
On the tests list, you can filter the table down to test cases that have a particular label applied. This makes labels useful for slicing the view by the categories your team cares about.
 ## Automatic labeling from monitors
The [pass-on-retry](../detection/pass-on-retry-monitor), [failure rate](../detection/failure-rate-monitor), and [failure count](../detection/failure-count-monitor) monitors can be configured to apply one or more labels to a test instead of classifying it as flaky or broken. Use this when you want a monitor to surface a pattern (for example, *fails on retry on PR branches*) for triage or filtering without changing the test's health status. The same setup also works as a [dry-run](../detection/#dry-running-with-labels) while you tune a new monitor before flipping it to classify.
### Choose the monitor's action
When you create or edit one of these monitors, the **Action** section asks what happens when the monitor activates:
* **Classify test status** (the default) — marks the test as flaky or broken while the monitor is active, and restores the test to healthy when the monitor resolves. This is the original behavior.
* **Apply labels** — adds the configured labels to the test while the monitor is active. The test's health status is not changed by this monitor.
A monitor uses one action or the other, not both.
### Configure the label action
After selecting **Apply labels**, pick one or more labels from your organization's label set. You can create a new label inline if the one you need doesn't exist yet — the new label is added to the org-wide set in [Settings > Organization > Test Labels](#manage-labels).
By default, the labels are removed when the monitor resolves. Turn off **Remove these labels when the monitor resolves** to keep them on the test after the monitor stops reporting.
### How monitor-applied labels appear
Monitor-applied labels show up in the same places as manually applied labels: as chips on the [tests list](#filter-tests-by-label) and on the test detail page. Hovering a label tells you whether a user, one or more monitors, or a combination applied it, along with when it was first applied.
When the same label is applied to a test by multiple sources (for example, by a user and by a monitor, or by two different monitors), the label stays on the test until every source removes it. Removing the source (such as disabling the monitor or switching its action away from **Apply labels**) clears that source's contribution on the next evaluation.
## Related
* [Managing detected flaky tests](./managing-detected-flaky-tests) — a step-by-step process for handling detected flaky tests
* [Flake Detection](../detection/) — monitors that watch for problematic test behavior
## Automatic labeling from monitors
The [pass-on-retry](../detection/pass-on-retry-monitor), [failure rate](../detection/failure-rate-monitor), and [failure count](../detection/failure-count-monitor) monitors can be configured to apply one or more labels to a test instead of classifying it as flaky or broken. Use this when you want a monitor to surface a pattern (for example, *fails on retry on PR branches*) for triage or filtering without changing the test's health status. The same setup also works as a [dry-run](../detection/#dry-running-with-labels) while you tune a new monitor before flipping it to classify.
### Choose the monitor's action
When you create or edit one of these monitors, the **Action** section asks what happens when the monitor activates:
* **Classify test status** (the default) — marks the test as flaky or broken while the monitor is active, and restores the test to healthy when the monitor resolves. This is the original behavior.
* **Apply labels** — adds the configured labels to the test while the monitor is active. The test's health status is not changed by this monitor.
A monitor uses one action or the other, not both.
### Configure the label action
After selecting **Apply labels**, pick one or more labels from your organization's label set. You can create a new label inline if the one you need doesn't exist yet — the new label is added to the org-wide set in [Settings > Organization > Test Labels](#manage-labels).
By default, the labels are removed when the monitor resolves. Turn off **Remove these labels when the monitor resolves** to keep them on the test after the monitor stops reporting.
### How monitor-applied labels appear
Monitor-applied labels show up in the same places as manually applied labels: as chips on the [tests list](#filter-tests-by-label) and on the test detail page. Hovering a label tells you whether a user, one or more monitors, or a combination applied it, along with when it was first applied.
When the same label is applied to a test by multiple sources (for example, by a user and by a monitor, or by two different monitors), the label stays on the test until every source removes it. Removing the source (such as disabling the monitor or switching its action away from **Apply labels**) clears that source's contribution on the next evaluation.
## Related
* [Managing detected flaky tests](./managing-detected-flaky-tests) — a step-by-step process for handling detected flaky tests
* [Flake Detection](../detection/) — monitors that watch for problematic test behavior