
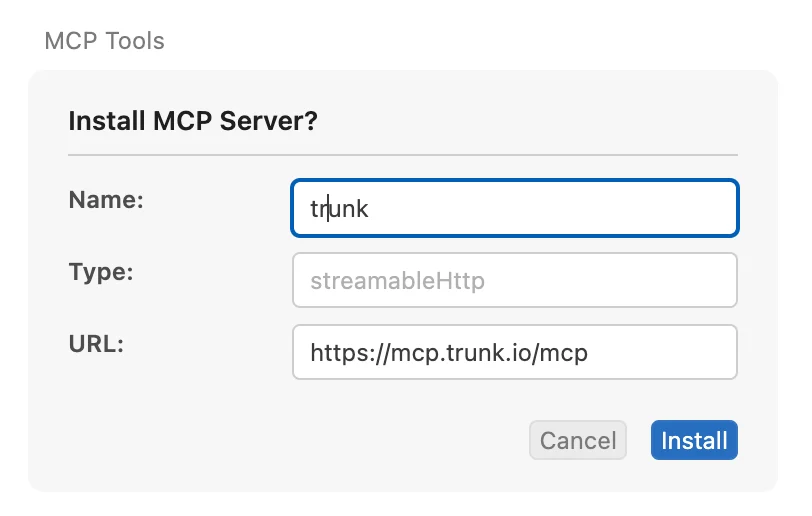
 ## Alternative: Update MCP configuration
Add the following [configuration](https://docs.cursor.com/en/context/mcp#model-context-protocol-mcp) to your project's `.cursor/mcp.json` file. If you want to enable it only for yourself, add it to `~/.cursor/mcp.json` instead.
```json theme={null}
{
"mcpServers": {
"trunk": {
"url": "https://mcp.trunk.io/mcp"
}
}
}
```
## Authentication with OAuth (default)
After the MCP server was added to Cursor, users need to authorize Cursor to communicate with the server. Follow these steps to complete auth.
**Step 1: Open MCP Settings**
Run `CMD+Shift+P` to open the command palette and select `View: Open MCP Settings`
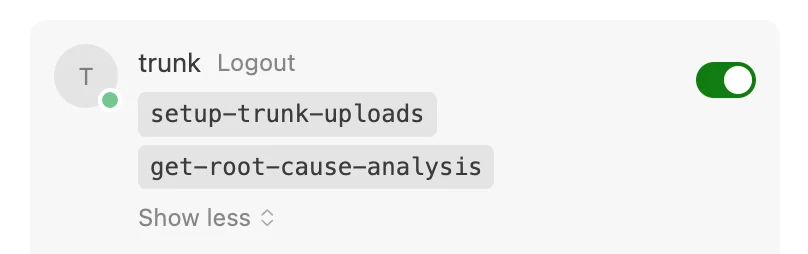
**Step 2: Enable the Trunk MCP server**
A "Needs authentication" status will be shown:
## Alternative: Update MCP configuration
Add the following [configuration](https://docs.cursor.com/en/context/mcp#model-context-protocol-mcp) to your project's `.cursor/mcp.json` file. If you want to enable it only for yourself, add it to `~/.cursor/mcp.json` instead.
```json theme={null}
{
"mcpServers": {
"trunk": {
"url": "https://mcp.trunk.io/mcp"
}
}
}
```
## Authentication with OAuth (default)
After the MCP server was added to Cursor, users need to authorize Cursor to communicate with the server. Follow these steps to complete auth.
**Step 1: Open MCP Settings**
Run `CMD+Shift+P` to open the command palette and select `View: Open MCP Settings`
**Step 2: Enable the Trunk MCP server**
A "Needs authentication" status will be shown:
 **Step 3: Login & authorize**
A new webpage will be opened. Login with your Trunk account and follow instructions to authorize Cursor to communicate with the MCP server.
**Step 4: Confirm**
Follow instructions to get back to Cursor. With auth completed, Cursor will be able to fetch the tools exposed by Trunk's MCP server:
**Step 3: Login & authorize**
A new webpage will be opened. Login with your Trunk account and follow instructions to authorize Cursor to communicate with the MCP server.
**Step 4: Confirm**
Follow instructions to get back to Cursor. With auth completed, Cursor will be able to fetch the tools exposed by Trunk's MCP server:
 ## Alternative: Authentication with API token
If you prefer not to use the OAuth flow, you can authenticate with your Trunk organization API token. Find your token under **Settings** → **Organization** → **General**, in the **API** section of the Trunk dashboard.
Add the token to your `.cursor/mcp.json`:
```json theme={null}
{
"mcpServers": {
"trunk": {
"url": "https://mcp.trunk.io/mcp",
"headers": {
"Authorization": "Bearer ${TRUNK_API_TOKEN}"
}
}
}
}
```
Set `TRUNK_API_TOKEN` as an environment variable. Cursor interpolates environment variables in MCP configuration files automatically.
## Alternative: Authentication with API token
If you prefer not to use the OAuth flow, you can authenticate with your Trunk organization API token. Find your token under **Settings** → **Organization** → **General**, in the **API** section of the Trunk dashboard.
Add the token to your `.cursor/mcp.json`:
```json theme={null}
{
"mcpServers": {
"trunk": {
"url": "https://mcp.trunk.io/mcp",
"headers": {
"Authorization": "Bearer ${TRUNK_API_TOKEN}"
}
}
}
}
```
Set `TRUNK_API_TOKEN` as an environment variable. Cursor interpolates environment variables in MCP configuration files automatically.